Creating a floor plan for a wedding ceremony and a reception may seem intuitive but it’s easy to get bogged down by the details. Here’s my advice as a professional wedding coordinator and consultant on how to make your own floor plans for a wedding.
Who makes the floor plan for a wedding?
When I started as a wedding planner eight years ago, venues nearly always owned this part of the planning. In fact, they preferred it! These days, however, I’ve noticed a shift.
Increasingly, I find that venues — even ones that cost $5,000+ for “just” the space, no other perks— are putting the onus on the client to make their own floor plans. Why the change? I’m not sure. I honestly think it makes for a bigger headache for the venue but I imagine this change comes down to having fewer people doing the same amount of labor at the venue.
This means that clients (a.k.a. you!) are more often on point to make the floor plans unless you have a vendor on your team who will do this. (If you decide to hire a wedding coordinator or planner, asking if they make floor plans is a good interview question. Not all tiers of coordinators and planners do this work. You can also ask the venue during your first tour of the space.)
When should I make a floor plan for a wedding?
I typically create the first draft of a floor plan when I place a rental order because I need the floor plan to tell me what to put on the rental order.
When do I place a rental order? Typically as soon as the catering for the wedding is decided. This is because catering typically has the biggest influence on what else needs to be on the rental order (i.e. does the caterer or whomever is handling the food need to rent barware? plates? utensils? chafing dishes? ovens?).
This chain of events usually happens within the first three months of wedding planning though it can successfully happen much later, particularly if you’re not planning to rent a high number of items and/or speciality items such as unique colors, designs, furniture, etc.
At the very latest, I recommend having a draft of a floor plan done at least 60 days before the wedding. This is also when you’re likely having what’s often known as a “final walkthrough,” or, to use the less ableist term, a “final tour.” That meeting will heavily influence the floor plan but it’s useful to have a rough draft to refer to during the tour.
You’ll likely edit your floor plan several times throughout the planning process but aim to have an at least 95 percent finished version done two weeks before the wedding. That way you can share it with the wedding vendors and, as applicable, the wedding VIPs when you send them the final timeline.
How do I make a floor plan for a wedding?
The tool I most commonly use (and most wedding venues use) is called Prismm (previously, AllSeated). It’s free.
You can also use it to track things like a guest list and to create a vendor directory but I’ve never used it in that way because I prefer my own Google Doc tracking tools. You can download and edit those same templates here.
These steps are specific to Prismm but should be fairly similar to any free floor plan tool you’ll find online.
Log into the floor plan tool.
Click “New Event.”
Fill out the event details. The only part of this that really matters is the name of the event, which you can always edit later.
You’ll arrive at a page that looks like this.
5. Important! Many venues have preloaded floor plan templates. Search this for yourself by adding your venue on the “+ Add Venue” box. Add your venue there and then proceed to step 6.
If searching your venue comes up dry and your venue didn’t proactively invite you to floor plan templates, stop here and ask them if they can.
If they can’t or they don’t have floor plan templates, you’ll need to use the “Custom” option. I included an example of how this can look in the gallery at the end of this article.
6. Click “Seating” at the top of the page.
7. Click the plus sign by “New Floorplan.”
8. If your venue has preloaded floor plan templates, you’ll see “Venue” above “Custom.” If your venue doesn’t have preloaded floor plan templates, you’ll only see “Custom.” It’ll look like the below (I added the red box).
9. If you see “Venue,” click that and select the template you want to use. Often, these templates have obscure names that may only vaguely correspond with the spaces you toured so if you’re confused, ask the venue which is which. Using the right template can save you hours of work and greatly minimizes errors.
If you don’t see “Venue” and only see “Custom,” click “Custom” and do your best to guesstimate the size of the space you’re creating the floorplan for. I don’t recommend this as it’s very easy to mess up sizing but do your best!
10. Start to make your floor plan.
Want a professional to gut check your floor plans? Here’s what people have to say about renting my Virgo wedding planner brain for an hour.
What do I have to include on a floor plan for a wedding?
For a wedding ceremony:
How your guests are observing the ceremony (i.e. are they sitting in chairs, standing, some sitting + some standing, etc.)
Any structures that you have at the front with you (e.g. a ceremony altar, a floral installation, etc.)
Any props you may have at the front with you (i.e. a table, a music stand, religious elements, etc.)
Any vendor tables (typically, this means a table for a DJ, as applicable, but it might also include vendor tables that will be set up in the ceremony space but not used until the reception, depending on if you’re using the same space for both events)
Any guest-specific activity tables (typically, this means a welcome and/or gift table)
Anything that might be available for both the ceremony and the reception (typically, this means any cocktail tables, bar tables, buffet tables, dessert tables, etc. that will be the same or nearly the same during both sections of the wedding)
Anything that’ll be staged for the reception (a common example are any post-ceremony meal tables that may be set up for the reception but not available to guests during the ceremony)
The line of the processional (I like to include this so I can visualize how the people proceeding into the ceremony will do so as to make sure nothing is in their way)
The line of the guest flow (I like to include this so I can visualize how guests are entering the space so as to make sure nothing is in their way)
For a wedding reception:
How your guests are observing the reception (i.e. are they sitting in chairs at tables, milling around cocktail-style, etc.) — don’t forget to include you and your partner(s)
Any structures (e.g. a ceremony altar that moved location after the ceremony, a floral installation, etc.)
Any vendor tables (e.g. a table for a DJ, a table for photo booth props, etc.)
Any guest-specific activity tables (typically, this means a welcome and/or gift table)
A dance floor (if applicable) — bonus points if you note which, if any, tables may need to be collapsed to either create or expand the dance floor during open dance floor time
Anything that might be available for both the ceremony and the reception (typically, this means any cocktail tables, bar tables, buffet tables, dessert tables, etc. that will be the same or nearly the same during both sections of the wedding)
The line of the guest flow (I like to include this so I can visualize how guests are entering the space so as to make sure nothing is in their way)
8 tips to successfully build a floor plan for a wedding
Making floor plans for a wedding is an unexpectedly creative act so everyone will do it a bit differently. Here are the tips that I use:
Make a floor plan for each major event on the wedding day. This nearly always means a floor plan for the ceremony and a floor plan for the reception.
Make a floor plan for the weather plan. I typically do this at the end of making the rough draft floor plans for the ceremony and reception.
I replicate each of those plans and make whatever tweaks we have in place for bad weather such as adding a note that a tent will be in place or creating a floor plan that shows tables and chairs moved inside.
Don’t have a weather plan for your wedding? This article might help.Keep a record of your floor plans. I do this by creating an “archived floor plans” folder for each of my clients. Then, anytime I have a new floor plan, I move the old floor plan into that folder. I rarely go through the archives but it’s useful to have a record just in case.
Label what’s coming from where and if we’re talking about linens, include the color. I do this because it helps me manage all of the moving parts on a busy event day.
Here’s the style I use next to each relevant item on a floor plan:
[insert what the item is] ([insert who’s providing this item])
Linen: [insert if there’s a linen; if there isn’t, write “N/A” or “unlinend” ([insert the color of this linen], [insert who’s providing this linen])
See examples of how this looks in the examples included at the end of this article.Label your floor plans. The nomenclature I use is:
[clients’ last names]_Ceremony_[the date I created this floor plan].pdf
[clients’ last names]_Reception_[the date I created this floor plan].pdf
[clients’ last names]_CeremonyRainPlan_[the date I created this floor plan].pdf
[clients’ last names]_ReceptionRainPlan_[the date I created this floor plan].pdfDon’t worry if the scale looks a little funny. I have never been able to find a chair option on Prismm that doesn’t make for giant-looking chairs. I don’t know why this is but as long as I’m using the venue-provided floor plan template, it’s never been a problem.
I also nearly always scoot the Prismm-created chair options closer together than how Prismm automatically renders them (I find Prismm spaces them too far apart).
A good rule of thumb is five chairs | aisle | five chairs and then as many rows back as needed to hit your estimated guest count (minus anyone who may be with you at the front of the ceremony vs. in the guest area).Start any guest tables for the reception at a standard number and refine later. Most weddings use one of three types of tables for a main meal: 60-inch rounds, six-foot rectangular tables, or eight-foot rectangular tables.
Each type of table has its own standard number of chairs: eight chairs for 60-inch rounds, six chairs for six-foot rectangular tables (not counting either spot on either end), and eight eight chairs for eight-foot rectangular tables (not counting either spot on either end).
For your rough draft floor plans, start your reception tables with the standard number of chairs. Then, once you’ve figured out who’s sitting at which table (assuming you’re assigning table numbers and/or specific seats), update the number of chairs at each table.
It’s particularly helpful if you list how many chairs are at which numbered table so that whomever is setting up those tables can easily look to see how many places they need to set. You can see examples of how I do this in the examples at the end of this article.
A good goal is to have that number of chairs per reception table ready by the time you send the floor plan to whomever is setting up the tables and chairs (e.g. the venue, a caterer, a coordinator, a friend, etc.)Don’t forget vendor tables! The most common ones are:
A table for music and/or A/V. Many DJs contractually require a client to provide a six-foot table and matching tablecloth and to have this table within a certain range from an electrical outlet. Don’t have a DJ? You’ll still probably need a table for however any music and/or A/V is being played.
Tables for food preparation. These nearly always don’t have linens with the actual number of tables varying (a good estimate is three to five). Ask your caterer, as applicable.
Tables for food display. This would mean any buffet tables and/or dessert table(s). Don’t forget tableclothes for these.
A table for any photo booth props (as applicable). Typically a cocktail table with a linen.
Use these example floor plans for your own wedding
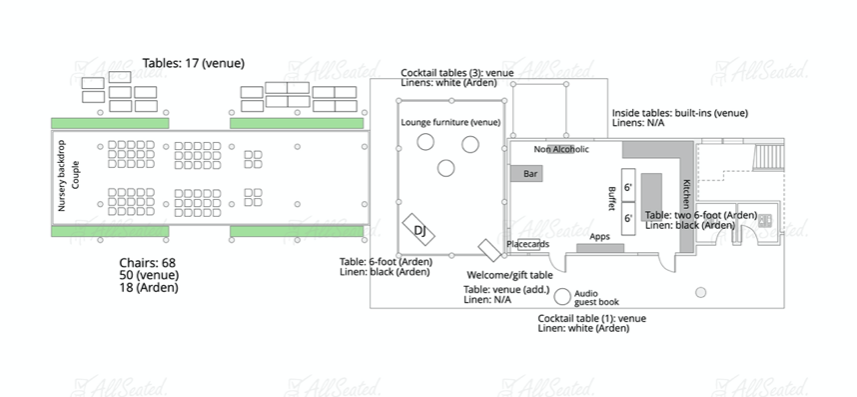
Example #1: 66-guest indoor wedding at Blockhouse in Portland, Oregon.
Slide #1 shows the set-up for the ceremony. Note the 17 reception tables at the top left of the image. These were pre-staged tables to be moved out into the ceremony space when I and the catering team “flipped” the space after the ceremony.
Slide #2 shows the set-up for the reception. This client used rectangular dinner tables and a sweetheart table (two-person table) for themselves. They had a one-sided buffet as noted on the right side of the slide.
“Arden” refers to the rental company hired for this event, Arden Event Collective.

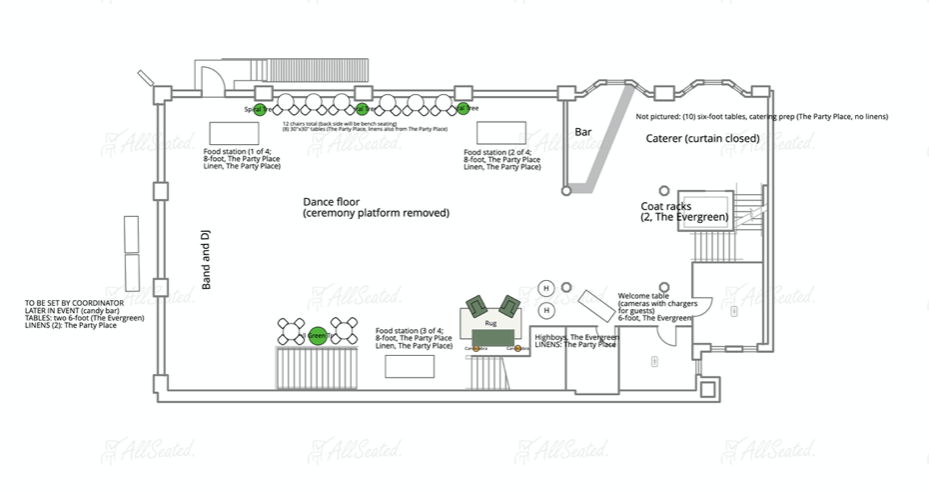
Example #2: 174-guest indoor wedding at The Evergreen in Portland, Oregon.
Slide #1 shows the set-up for the ceremony. This client opted to “only” have seats available for a percentage of their guests. The rest stood (not a bad option for nearly all ceremonies and guest populations!). This wedding also had a chuppah and a stage as well as rented furniture and plants, all noted on the floor plans.
Slide #2 shows the set-up for the mezzanine (ceremony and reception). This venue has an upper mezzanine level. This client used that space for a photo booth, food station, and additional cocktail tables.
Slide #3 shows the set-up for the reception. This client elected to have a cocktail-style reception. This means guests did not sit at tables during dinner. Instead, they freely circulated between food stations that were positioned around the venue.
“The Party Place” refers to the rental company hired for this event, now known as Arden Event Collective.


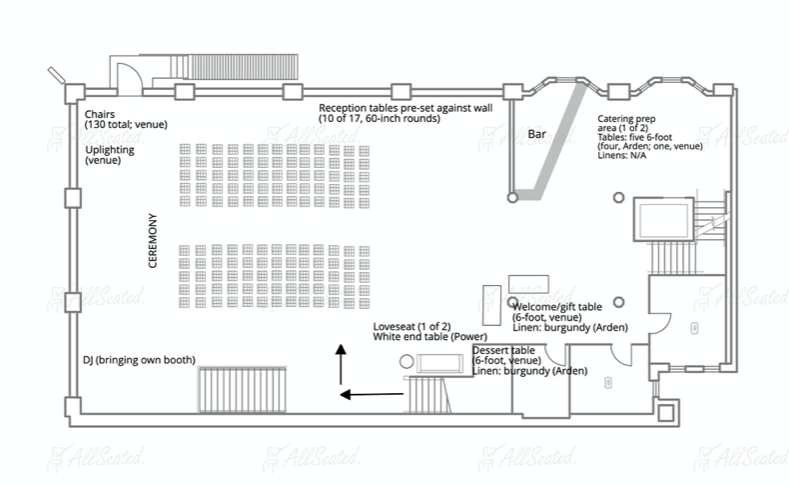
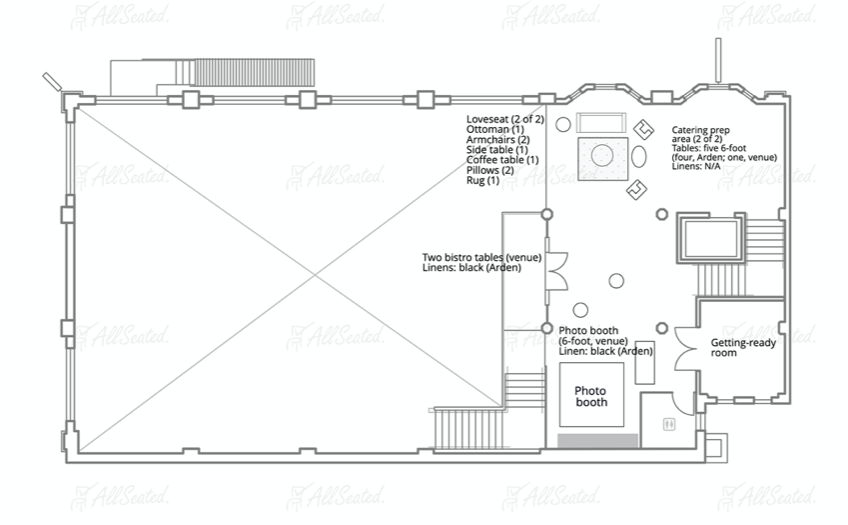
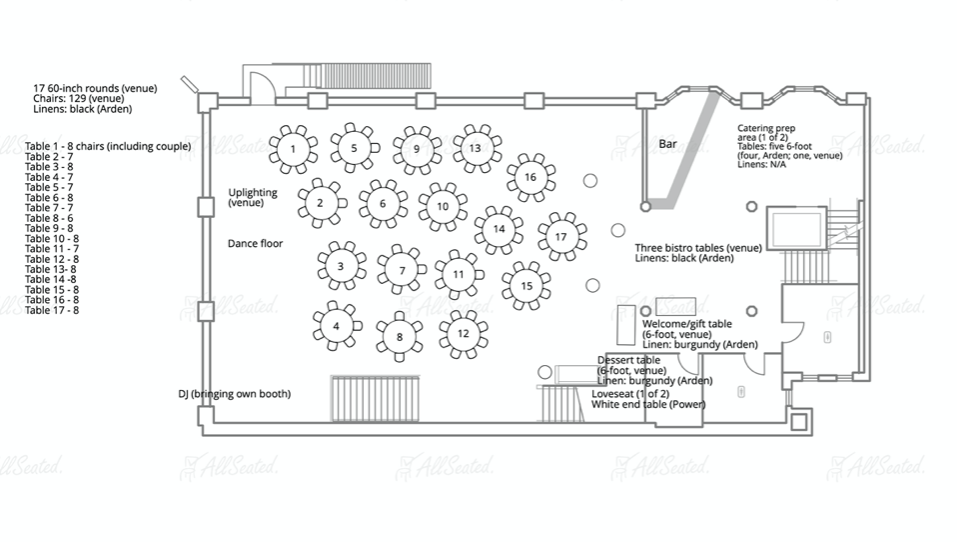
Example #3: 129-guest indoor wedding at The Evergreen in Portland, Oregon.
Slide #1 shows the set-up for the ceremony. This is the same venue as example #2 but with seating for all guests. Note the text about reception tables staged along the top wall. These were set for dinner and were moved out after the ceremony by myself and catering while the guests proceeded downstairs (not pictured) for a post-ceremony cocktail hour.
I didn’t include the actual tables because I find they unnecessarily clutter the floor plan and can make the client worry that the tables will be all up in their guests’ business (they’re not).
Slide #2 shows the set-up for the mezzanine (ceremony and reception). This venue has an upper mezzanine level. This client used that space for a photo booth and low-stimulation area with lounge furniture, games, and books.
Slide #3 shows the set-up for the reception. Check out the list on the left side. That’s a list of each table number and the number of chairs at each table. This is very useful to have for set-up! These folks had a plated dinner (i.e. the food was brought to their guests vs. their guests going through a buffet line).
“Arden” refers to the rental company hired for this event, Arden Event Collective.
Example #4: 67-guest outdoor wedding at Leach Botanical Garden in Portland, Oregon.
Slide #1 shows the set-up for the ceremony. This is the Manor House at Leach Botanical Garden. Note the catering tables in the bottom right; these are out of view for the guests and in the same area as where the processional lines up to enter the ceremony space.
Slide #2 shows the weather plan for the ceremony. You’ll see a note about a tent on the left side of this slide and two cocktail tables removed.
Slide #3 shows the set-up for the reception. This client elected to use rectangular tables and had a plated dinner (i.e. the food was brought to them vs. their guests going through a buffet). For the tables and chairs, I always optimize to use inventory that’s already included with the venue rental (if any inventory is included) and then, as needed, supplement from a rental company. You’ll see that breakdown noted above the tables.
Slide #4 shows the weather plan for the reception. There’s the same note about a tent with the dance floor and dessert table moved under said tent.
“Arden” refers to the rental company hired for this event, Arden Event Collective.
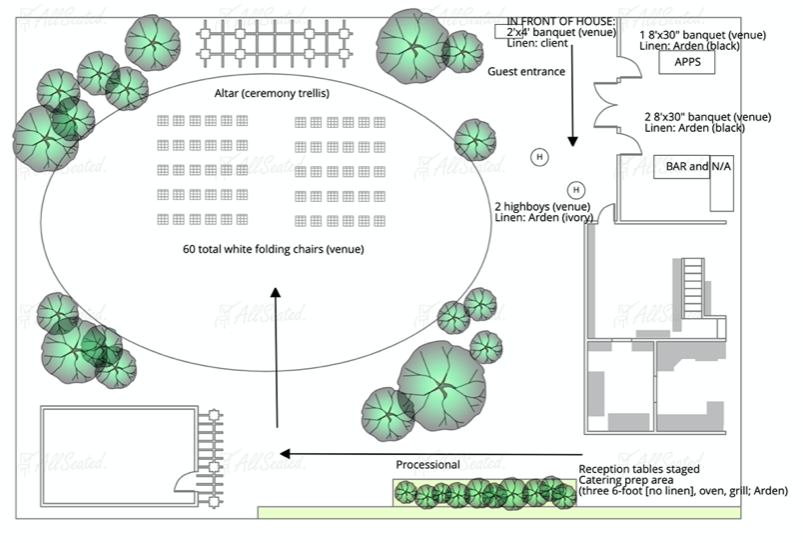


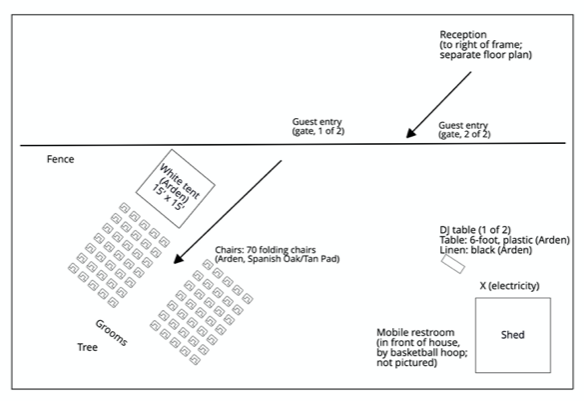
Example #5: 63-guest outdoor wedding at a private home in Portland, Oregon.
Slide #1 shows the set-up for the ceremony. The venue was a private home so there was no template; I had to make my own. I did my best to guesstimate the sizing of the spaces and was very particular on where electric outlets and water access were (necessary information for the DJ and the rented toilet trailer).
Slide #2shows the set-up for the reception. This wedding had a Sperry tent, which has very particular spacing requirements that required the tent vendor attend the final tour.
“Arden” refers to the rental company hired for this event, Arden Event Collective.
